Dynamically hide a page in Power BI
Edit: Hi guys - as this is one of my most popular pages, I decided to add an additional trick to the post. It uses a new PowerBI feature, not available when I originally wrote this blog, and it achieves a slightly different effect. Both techniques would give you some good tips for your toolkit anyway, but read both and choose whichever approach will work best for your usecase.
If you want to check out the novel appraoch just scroll down to the Nov 2020 update section. Thanks to Rich Payne for getting in touch to suggest this approach!
Hi everyone - inaugural blog here.
I think blogs where there is a massive preamble about the person before they get to the tech solution, which is the only thing you came for, are pretty self indulgent, and this blog is going to be pretty self indulgent anyway, so lets skip straight ahead to the techie bit -
Problem
So here is a use case for you. You have a client who wants a PowerBI report and they want to have a special area for the important people. The data can't be shared with the regular users. We can restrict the data using PowerBI's Row Level Security (RLS), but that doesn't make visuals or pages disappear.
Any end user finding a screen that is all blank - even if there is a note explaining they may not have access to view it, will typically email you to complain that your solution is broken. This is not ideal.
However, currently there is no functionality to dynamically hide a page so what can we do?
Fortunately there is a sneaky work around...
Solution
This solution doesn't actually require RLS to work, but you will need a table with all of your user's email addresses and their status. For that reason, this information is probably easiest to keep on a RLS table, but as you'll see, you can do this without any kind of RLS table.
I have a super simple table for this, called RLS, which holds each users email address, name and whether they are (1) or not (0) a superuser. In this case, we have me and my dog, Sherlock. Now I don't trust him to see all my secret data, so I'm a superuser and he isn't.

So let's bring that data in PowerBI. Ordinarily of course, this RLS table would need some more data and to be connected to a fact table! This post isn't going to cover setting up basic RLS - if you need to know more about that try this article from RADACAD, we only need it to obtain that status.
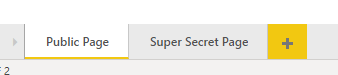
So to show the secret data to superusers while hiding any kind of blanks from our regular users we need to set up 2 pages. We have our public page, which everyone can see, and we have our super secret page.
Next job, we will need to help PowerBI know who can see what. If we build a measure that retrieves the users email address, we could use that to identify who is using our report. We can grab that using the USERPRINCIPALNAME function.
You can also use the USERNAME function, in the PowerBI service they will work the same - but the USERPRINCIPALNAME function is a little easier to use for testing. This is because in the desktop version USERNAME( ) returns the current users name in the form of Domain\User, whereas USERPRINCIPALNAME will return the current user's name as an email address user@email.com.
Either way now we know who our user is. Next step is to find a way to match that name against our RLS list. This is easy to do with this code:
SuperUserCheck=
LOOKUPVALUE (
RLS[SuperUser?] ,
RLS[Email] ,
[UserPrincipalName]
)
Basically this is pretty much the DAX equivalent of a VLOOKUP! We take our measure [UserPrincipalName] which we just created and we search our RLS[Email] for a match. Once it finds that match it will return the value from the first column in the LOOKUPVALUE function, which is our RLS[SuperUser?] column.
So, if I were to look at this measure it'll identify my email is in the list and I am a super user, and will return the value of 1. But if Sherlock logged in, this measure will return a 0.

As we can see this measure is working.
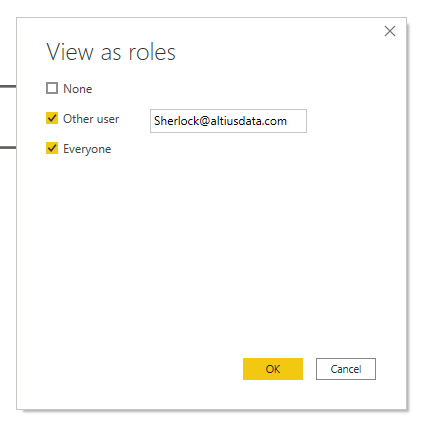
Just a quick tip here - if you didn't know, you can view your report as a security role that you've setup by going to Modelling > Security > View As. In this report, I've set up a security group that only allows a user to see data associated with their own email, which I've called Everyone. You can also view the report as if you were a specific user.
What is cool, is you can view as a role and a specific user at the same time, which is super helpful for testing!
Anyway, next task is to use that measure to dynamically control who can see which tabs.
Firstly we will build a button on our Public Page. This button will link through to our Super Secret View.
As of the March 2020 update buttons can now link directly to pages, but if you are using an old version of PowerBI you can just make a bookmark of the target page and set the button action to invoke that bookmark.
We also need a visual with conditional formatting. Use anything you like for this, although I find the Advance Card visual (a custom visual by Bhavesh Jadav, certified by Microsoft) is the easiest visual to use. I put my [SuperUserCheck] measure into the "Condition Field" and then set the background colour to a cheery blue if the [SuperUserCheck] returns a 1, or else it'll be white (tip - you have to make sure the fill toggle is set to on, or it won't change).

You can see here this is working. Now the magic bit - turn off the outline of the button and change the text to white. Then lay it over the advance card, making sure the button is on top.
Now we can see the final effect - Sherlock can't see a button to click, but as soon as a SuperUser looks, the background goes blue, highlighting the button.

Then before you publish to the service just hide the Super Secret Page - now an end user will only be able to access it via the button, effectively placing it out of reach for regular users.
One thing to be aware of, is the button is still actually there even when viewed by a regular user - if they click the space where the button will be the link will still work! For that reason try put it somewhere where a user is unlikely to click randomly, and of course you should still enact RLS to make sure that if a user does get through by some fluke, they can't see anything they shouldn't. This will discourage most users from ever discovering your secret page however.
I hope you found this helpful! If you have any questions feel free to comment below and I'll try help you out! Also, if you have a request for any future blog content, let me know.
Final thing - since writing this I’ve been made aware James Dales has a blog post about a very similar technique, which I didn’t see before writing this! Anyway, you can view the original post here.
As a reward for getting through this, here's a picture of Sherlock, presumably somewhat irritated he isn't allowed to see the super secret view.

Nov 2020 Update
So, as mentioned at the top, thanks to the custom formatting options now available to us, there is another way to implement the button. This approach works a bit differently however, instead of having a button that will hide for people who aren’t allowed to see specific data, this approach will instead have one button, visible to everyone that will only direct appropriate users to the secret pages. Like usual I’m just going to show you how to use this technique - it’s up to you how to implement it. For example you could have a redirect page setup so if a user without access clicks the button, it could send them to a page advising they don’t have access, maybe even a button to request access. Or you could create two pages, a secret and a everybody view and link appropriately based on the users credentials.
Anyway let’s jump in. I’m going to reuse the same approach from the original part of this blog. Except this time I’m going to hide my idea for Sherlock’s christmas present from him. So, if I use this report I want to be able to see the page with that secret present data, but Sherlock should be redirected somewhere else, so he won’t ruin his surprise.
To achieve this we are going to use custom formatting so we will need to create 2 new dynamic measures.

The first measure will create some dynamic text for our button - the button will have a different action depending on the users credentials, so it would be tricky to write a description on the button that will work for both user groups if the text is static. So for this, as you can see in the screenshot above, we lookup the SuperUser flag (1 for SuperUser, 0 for regular user) for the current user, by comparing the Email column to the results of the UserPrincipleName measure, which as you saw in the first part of this blog, simply returns the current users principal name. This measure will then either return text for SuperUsers, or, if the user isn’t found in the RLS table, or if they are not a SuperUser then it will return the null text, in this case, an admonishment for trying to find out what his gift will be.

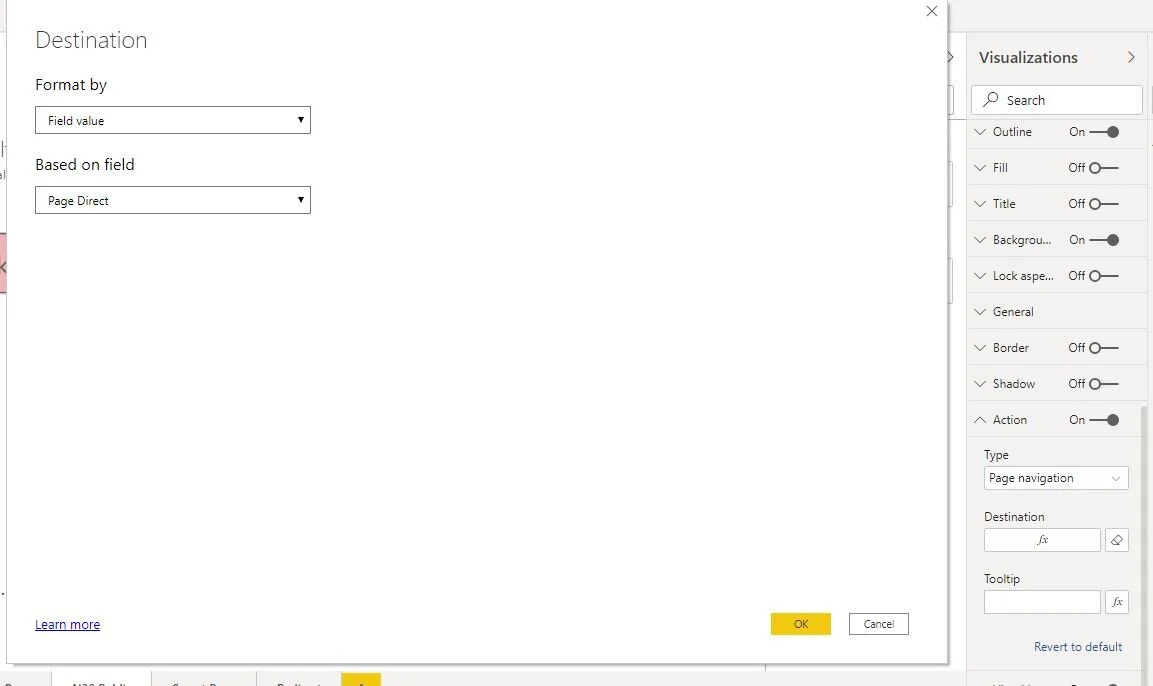
Second measure is almost identical to the first, except this measure will decide which page the user should be directed to. In my report I have a page named “Secret Page” for the SuperUsers, and a page called “Redirect” for the regular users. This measure does the same as the button text except it will return different values.

You can see in the image above that the output of the page direct measure correspond to my page names. This is because when the button action invokes the page navigation, it will take the user to the page with the name that our measure provides. For this reason, be careful with naming conventions, as if you misspell or mismatch the page names and output of this measure in any way, the button will fail and tell you no such page exists.
Now, if you insert a button into your report and go to the formatting ribbon you can see the Button Text options. Click the fx button (on the top screenshot) and you’ll get a menu popup that will allow you to set a measure to control the button text - simply select the “Button Text” measure we created.


Then further down the formatting ribbon we see the “Action” options - repeat the same exercise here, assigning the action to page navigation and feeding the “Page Direct” measure as the field, as per the screenshot below.
And that is it - you are good to go!
However, just before releasing this into the wild, we should check it has worked. We can do this using the view roles as technique, covered in the original blog. Lets see what happens if I view this report as me (left) or Sherlock (right)


Awesome! By the way, no one tell Sherlock what his present will be!
So what is actually going on here?
The secret is that the button on our first page is using dynamic measures to decide it’s text and action. Because the measure uses the USERPRINCIPALNAME function the button’s functionality is tied to the users identity. In this way we can ensure that no one can see the hidden page without the correct credentials.
One advantage of this approach is that you aren’t hiding the button, so there is no chance a user can accidentally find their way to the secret page, but the trade off is it does mean all users will see this button - and it has to do something for the regular users as well. If you passed the page navigation function a blank value, for instance, then to a user it will appear broken. Similarly linking them to the current page isn’t a great user experience either and again may result in some tickets being raised!
If however you want to show regular users a different page, or give them a redirect page (perhaps with the option to request access) this could be a great technique.

After unsuccessfully trying to find out what his present will be Sherlock has gone to sleep off his disappointment.
Hope you guys found this useful, and again thanks to Rich Payne for the tip.